
Featured image for nuwave air fryer cooking guide
Image source: i.pinimg.com
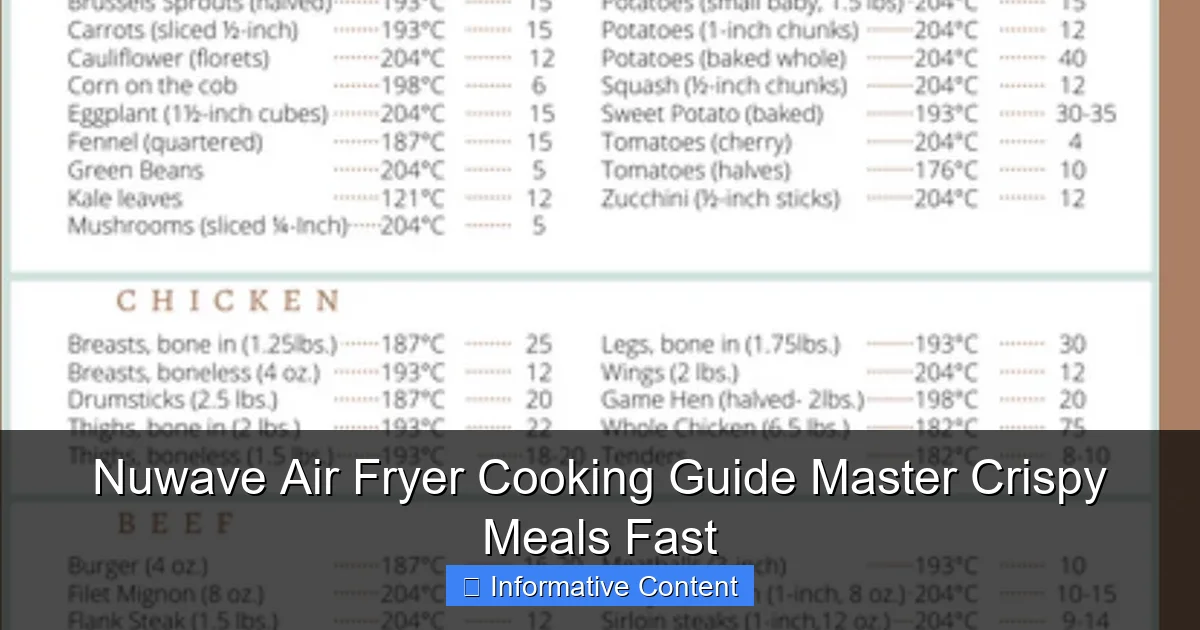
The NuWave Air Fryer Cooking Guide unlocks crispy, delicious meals in minutes with easy-to-follow instructions for perfect results every time. From golden fries to juicy chicken, this guide maximizes flavor and efficiency using precise temperature control and rapid air circulation technology.
Key Takeaways
- Preheat your Nuwave air fryer for crispier, evenly cooked meals every time.
- Use minimal oil to achieve golden, crunchy textures without excess fat.
- Shake or flip food halfway through cooking for uniform browning and crispiness.
- Opt for single-layer batches to ensure optimal air circulation and faster cooking.
- Experiment with presets to master cooking times and temperatures for various dishes.
- Clean immediately after use to maintain performance and extend appliance lifespan.
📑 Table of Contents
- Why the Nuwave Air Fryer Deserves a Spot on Your Countertop
- Getting Started: Unboxing, Setup, and First Steps
- Nuwave Air Fryer Cooking Guide: Mastering Temperature, Time, and Techniques
- Nuwave Air Fryer Recipes: 5 Fast & Foolproof Ideas
- Nuwave Air Fryer Maintenance: Keep It Clean & Lasting
- Nuwave Air Fryer: Pros, Cons, and Who Should Buy It?
- Final Thoughts: Your Path to Crispy, Guilt-Free Cooking
Why the Nuwave Air Fryer Deserves a Spot on Your Countertop
Let’s be real—cooking healthy meals fast is the dream, right? Between work, family, and the occasional Netflix binge, who has time to stand over a sizzling stovetop or wait 45 minutes for the oven to preheat? That’s where my Nuwave Air Fryer swooped in like a kitchen superhero. I’ll never forget the first time I made crispy, golden chicken wings without a drop of oil. My husband, a die-hard deep-fry fanatic, took one bite and said, “Okay, I’m impressed.” That’s when I knew this little gadget was a game-changer.
The Nuwave Air Fryer isn’t just another appliance collecting dust. It’s a versatile, time-saving tool that uses rapid hot air circulation to cook food with up to 85% less oil than traditional frying. Whether you’re a busy parent, a meal prepper, or someone who just wants crispy fries without guilt, this guide will walk you through everything you need to know—from unboxing to mastering pro-level techniques. No fluff, no hype, just honest tips and real-world examples to help you cook faster, healthier, and (dare I say) more delicious meals.
Getting Started: Unboxing, Setup, and First Steps
What’s in the Box?
When you unbox your Nuwave Air Fryer, you’ll typically find:
Visual guide about nuwave air fryer cooking guide
Image source: i.pinimg.com
- The main air fryer unit with a digital control panel
- Non-stick cooking basket with a handle
- Crumb tray (to catch drips and prevent smoke)
- Recipe booklet (with 10+ starter recipes)
- User manual (don’t skip this!)
Pro tip: Wash the basket and tray with warm, soapy water before first use. The non-stick coating is durable, but a quick rinse removes any factory residue.
Finding the Perfect Spot
Place your Nuwave Air Fryer on a heat-resistant, flat surface with at least 5 inches of clearance on all sides. I learned this the hard way when I placed mine too close to the backsplash—smoke alarms, anyone? Also, avoid overcrowding. If you’re cooking for a family of four, consider a 6- or 8-quart model (like the Nuwave Brio 6-Quart or 8-Quart XL) for larger batches.
First Use: The “Burn-In” Process
Before cooking food, run the air fryer empty for 10 minutes at 400°F. This burns off any manufacturing oils and preps the unit. You might see a little smoke—totally normal! Just open a window and let the kitchen fan do its thing. Afterward, wipe the basket with a damp cloth. Now you’re ready to cook.
Navigating the Control Panel
Most Nuwave models (like the Nuwave Brio or Pro Plus) have a digital interface with:
- Preheat button: Saves time—no need to manually preheat.
- Temperature range: 100°F to 400°F (great for dehydrating or searing).
- Timer: Up to 60 minutes (some models go to 120 minutes).
- Presets: Chicken, fries, fish, etc. (Use these as a starting point, but adjust as needed.)
Example: For frozen french fries, use the “Fries” preset (usually 400°F for 15 minutes). Shake the basket halfway through for even crispiness.
Nuwave Air Fryer Cooking Guide: Mastering Temperature, Time, and Techniques
The Golden Rule: Less Oil, More Crisp
One tablespoon of oil is often enough for 4 cups of food. For extra crunch, lightly spray or toss food in oil before cooking. I use avocado oil (high smoke point) or olive oil spray. Avoid heavy coatings—they can cause smoking or uneven cooking.
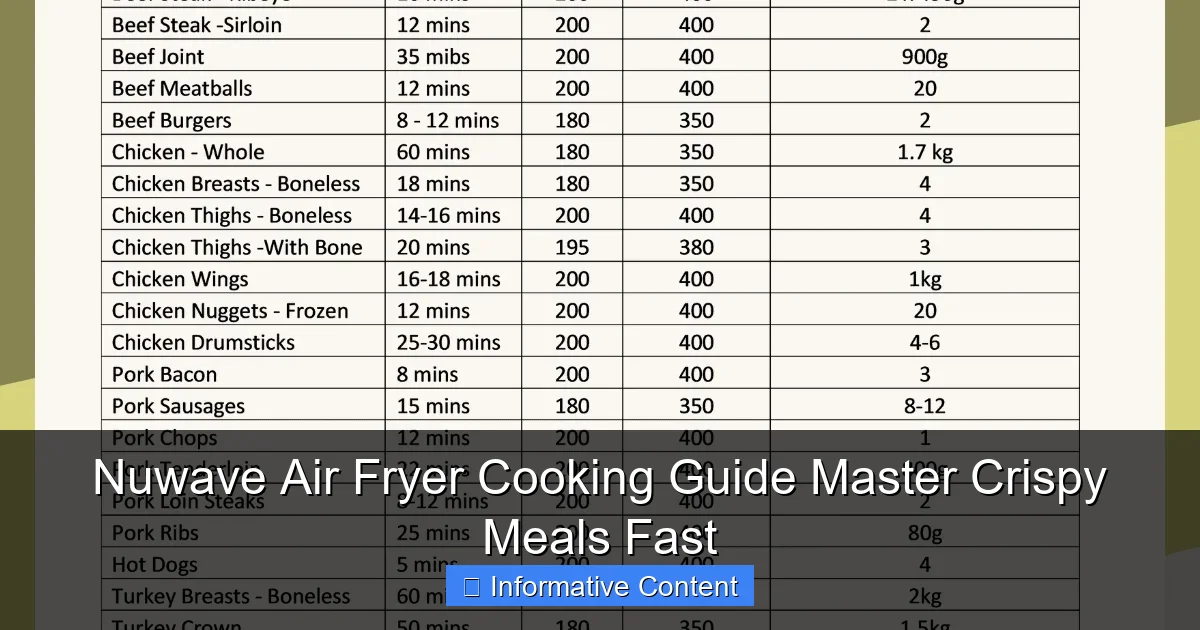
Temperature Guide for Common Foods
Here’s a quick reference for optimal temps and times:
| Food | Temperature | Time | Tips |
|---|---|---|---|
| Chicken Wings | 380°F | 20–25 mins | Flip halfway. Toss in sauce *after* cooking to avoid sogginess. |
| Frozen Fries | 400°F | 12–15 mins | Shake basket every 5 mins. Soak in water first for extra crisp. |
| Salmon Fillet | 375°F | 10–12 mins | Pat dry. Add lemon slices for flavor. |
| Vegetables (Broccoli, Brussels Sprouts) | 375°F | 8–12 mins | Toss with oil and salt. Don’t overcrowd—use 2 batches if needed. |
| Frozen Pizza | 360°F | 10–12 mins | Cut into slices to fit. Add extra cheese after 8 mins. |
| Hard-Boiled Eggs | 270°F | 15 mins | Peel immediately after cooking for easy shell removal. |
Pro Tips for Crispy Perfection
- Don’t overcrowd: Leave space between items. For fries, fill the basket halfway max.
- Shake or flip halfway: Ensures even cooking. Set a timer!
- Pat food dry: Wet chicken or veggies steam instead of crisping. Paper towels are your friend.
- Use a meat thermometer: For proteins, internal temps matter more than time. Chicken should hit 165°F.
- Reheat leftovers: 350°F for 3–5 mins revives pizza, fries, or nuggets better than a microwave.
Beyond Frying: Baking, Roasting, and Dehydrating
The Nuwave Air Fryer isn’t just for fried food. Try:
- Baking: 325°F for 20–25 mins (e.g., mini muffins, brownies in a ramekin).
- Roasting: 375°F for 15–20 mins (e.g., garlic, whole chicken, or pork chops).
- Dehydrating: 100–125°F for 4–6 hours (e.g., fruit chips, beef jerky).
Example: For crispy kale chips, toss chopped kale with 1 tsp oil and salt. Air fry at 350°F for 5–7 mins, shaking once. They’ll disappear faster than you can say “healthy snack.”
Nuwave Air Fryer Recipes: 5 Fast & Foolproof Ideas
1. Crispy Parmesan Brussels Sprouts (15 mins)
Perfect for picky eaters who hate veggies.
- Trim 1 lb Brussels sprouts and halve them.
- Toss with 1 tbsp olive oil, 1/2 tsp garlic powder, and salt.
- Air fry at 375°F for 10 mins. Shake halfway.
- Sprinkle with 2 tbsp grated parmesan. Cook 2 more mins.
Pro tip: For extra crunch, add a handful of panko breadcrumbs to the parmesan.
2. Garlic Butter Shrimp (12 mins)
Date night-worthy in under 15 minutes.
- Toss 1 lb peeled shrimp with 1 tbsp melted butter, 1 tsp garlic, and lemon zest.
- Air fry at 375°F for 8 mins. Flip halfway.
- Finish with chopped parsley and lemon juice.
Note: Use large shrimp (21–25 count) to avoid overcooking.
3. “Fried” Chicken Tenders (20 mins)
No deep fryer, no mess.
- Pat 1 lb chicken tenders dry. Season with paprika, salt, and pepper.
- Dredge in flour, then beaten egg, then panko breadcrumbs.
- Lightly spray with oil. Air fry at 380°F for 12 mins. Flip halfway.
Bonus: Serve with honey mustard or buffalo sauce.
4. Stuffed Portobello Mushrooms (18 mins)
Meatless Monday magic.
- Remove stems from 4 large mushrooms. Brush caps with olive oil.
- Fill with a mix of sautéed spinach, garlic, breadcrumbs, and goat cheese.
- Air fry at 360°F for 12 mins. Top with extra cheese. Cook 2 more mins.
5. Cinnamon Apple Chips (Dehydrated, 4 hours)
Healthy snack for kids (or adults).
- Thinly slice 2 apples. Toss with 1 tsp cinnamon and 1 tbsp lemon juice.
- Arrange in a single layer on the basket. Dehydrate at 125°F for 4 hours.
- Store in an airtight container for up to 2 weeks.
Nuwave Air Fryer Maintenance: Keep It Clean & Lasting
Daily Cleaning Routine
After each use:
- Unplug the unit and let it cool for 10–15 mins.
- Remove the basket and crumb tray. Soak in warm, soapy water for 10 mins.
- Wipe the interior with a damp cloth. Never submerge the main unit!
- Dry thoroughly before reassembling.
Warning: The non-stick coating is durable, but avoid metal utensils or abrasive sponges. I learned this when I scratched my basket with a fork—oops.
Deep Cleaning Monthly
For stubborn grease or odors:
- Make a paste of baking soda and water. Scrub the basket with a soft brush.
- Wipe the heating element (top interior) with a damp cloth. Never use water!
- Run the air fryer empty at 400°F for 5 mins to burn off residue.
Storage Tips
When not in use:
- Store in a dry cabinet. Cover with a cloth to prevent dust.
- Keep the basket and tray separate to avoid scratching.
- If you have a Nuwave Brio with a window, use it to monitor cooking—no need to open the basket.
Nuwave Air Fryer: Pros, Cons, and Who Should Buy It?
The Good
- Speedy cooking: Fries in 12 mins vs. 25 mins in an oven.
- Energy-efficient: Uses less electricity than a full oven.
- Versatile: Fries, bakes, roasts, dehydrates—all in one.
- Easy cleanup: Dishwasher-safe basket and tray (check model).
- Smart presets: Great for beginners (though I tweak them often).
Example: I reheated leftover pizza in 3 mins—crispy crust, melty cheese. Microwave who?
The Not-So-Good
- Size limitations: Smaller baskets mean batch cooking for families.
- Learning curve: Presets aren’t always perfect. Adjust temps/times as you learn.
- Noise level: It sounds like a loud fan. Not ideal for quiet kitchens.
- Noisy when shaking: The basket clatters if you shake it aggressively.
Real talk: I wish the crumb tray were deeper. It catches drips well, but greasy foods (like bacon) can still smoke if you’re not careful.
Who Should Buy It?
- Busy families: Quick weeknight dinners without takeout.
- Health-conscious eaters: Crispy food with minimal oil.
- Small kitchens: Saves counter space vs. multiple appliances.
- College students: Dorm-friendly and easy to clean.
Who might not need it? If you already have a convection oven, you might not notice a huge difference. But for apartment dwellers or those without ovens, the Nuwave is a lifesaver.
Final Thoughts: Your Path to Crispy, Guilt-Free Cooking
After months of testing my Nuwave Air Fryer, I can confidently say it’s one of the few gadgets that’s earned its keep in my kitchen. Yes, it has quirks—like the occasional smoke alarm scare (my bad for overloading the basket)—but the pros far outweigh the cons. It’s not just about speed or health; it’s about rediscovering joy in cooking. There’s something magical about pulling a tray of golden, crispy wings out of a machine that feels like it’s from the future.
To get the most out of your Nuwave, remember three things: prep your food right (dry, lightly oiled, not overcrowded), shake or flip halfway, and experiment. Start with the presets, but don’t be afraid to tweak. That’s how I discovered my perfect sweet potato fry time (400°F for 14 mins, shaken twice). And don’t forget the recipes—whether it’s garlic shrimp for a weeknight or apple chips for a school snack, the possibilities are endless.
So, if you’re on the fence, take the plunge. Your taste buds (and your waistline) will thank you. And when your skeptical partner finally admits your air-fried chicken tastes better than the deep-fried version? That’s the real win. Happy air frying!
Frequently Asked Questions
What is the Nuwave Air Fryer Cooking Guide, and how can it help me?
The Nuwave Air Fryer Cooking Guide is a comprehensive resource for mastering quick, crispy meals using your Nuwave air fryer. It includes time-saving tips, recipes, and techniques tailored to this appliance for perfect results every time.
How do I cook frozen foods in my Nuwave air fryer?
Most frozen foods, like fries or chicken tenders, can go straight into the air fryer—no thawing needed. Use the Nuwave Air Fryer Cooking Guide recommended settings (typically 360°F for 10–15 minutes) and shake the basket halfway for even crispness.
Can I bake or roast in a Nuwave air fryer?
Yes! The Nuwave air fryer doubles as a mini convection oven. The guide includes recipes for baked goods, roasts, and even dehydrated snacks, all optimized for even cooking and minimal oil.
What are the best foods to cook in a Nuwave air fryer?
From crispy veggies and juicy meats to reheating leftovers, the air fryer handles it all. The guide highlights top-rated recipes, including “fail-proof” chicken wings and golden Brussels sprouts.
How do I clean my Nuwave air fryer after cooking?
Let the basket and tray cool, then wash with warm, soapy water or place in the dishwasher if labeled safe. Wipe the exterior with a damp cloth—avoid submerging the main unit.
Does the Nuwave Air Fryer Cooking Guide include healthy recipes?
Absolutely! The guide features low-fat, low-sugar, and gluten-free options, showing how the air fryer’s rapid air technology cuts oil use by up to 80% without sacrificing crunch.