
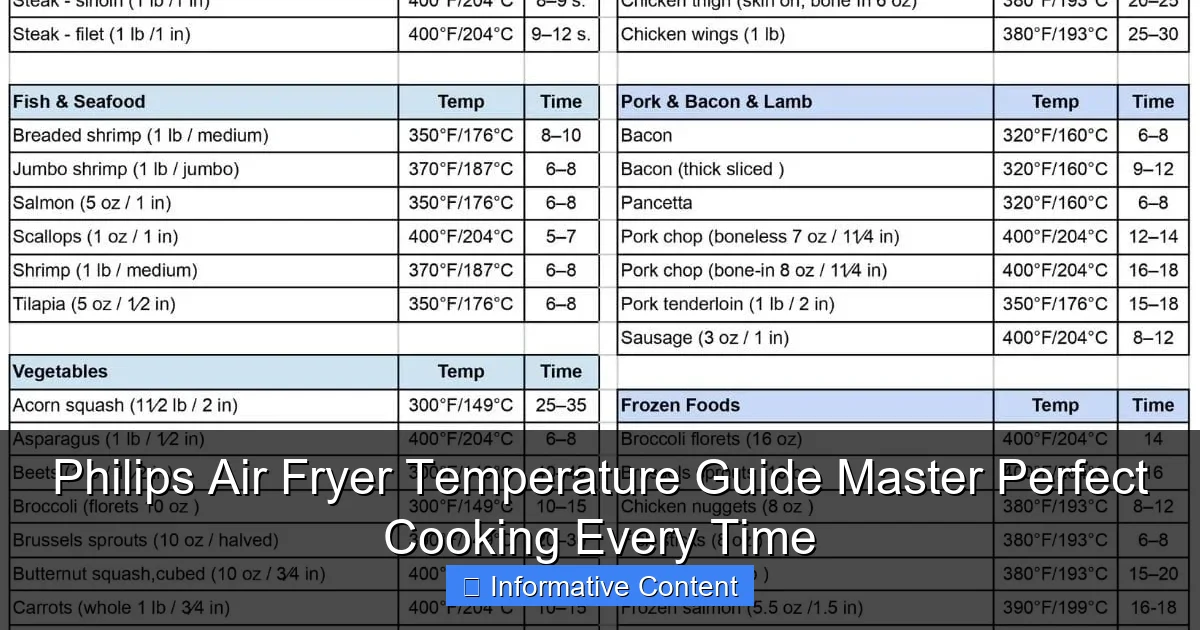
Featured image for philips air fryer temperature guide
Image source: iheartumami.com
Master the ideal cooking temperatures for your Philips Air Fryer and achieve perfectly crispy, evenly cooked meals every time. This essential Philips air fryer temperature guide takes the guesswork out of frying, roasting, baking, and reheating by providing precise heat settings for meats, veggies, frozen foods, and more—ensuring delicious results with minimal oil. Say goodbye to undercooked centers and burnt edges with expert-backed tips tailored to your model.
Key Takeaways
- Master preset temperatures: Use built-in presets for foolproof cooking results every time.
- Adjust for thickness: Thicker foods need lower temps and longer cook times.
- Preheat for crispiness: Always preheat to ensure even browning and texture.
- Flip halfway through: Flip food for uniform cooking and better crispiness.
- Use oil sparingly: A light spray enhances crispness without excess fat.
- Monitor closely: Check early to avoid overcooking, especially with small items.
📑 Table of Contents
- Why Temperature Matters in Air Frying
- Understanding Your Philips Air Fryer’s Temperature Range
- Temperature Settings for Popular Foods (With Real-World Examples)
- Advanced Tips for Precision Cooking
- Temperature Adjustments for Special Diets & Preferences
- Common Mistakes & How to Fix Them
- Data Table: Quick-Reference Temperature Guide
- Final Thoughts: Your Path to Air Fryer Mastery
Why Temperature Matters in Air Frying
When I first got my Philips air fryer, I thought I could just toss in frozen fries, set it to “high,” and walk away. Spoiler: my first batch was either burnt or still icy in the middle. It didn’t take long to realize that temperature control is the secret weapon behind crispy, evenly cooked meals. Unlike traditional frying—where oil absorbs heat unevenly—air fryers circulate hot air at precise levels, making temperature the MVP of the cooking game. Whether you’re reheating leftovers or trying a new recipe, nailing the right heat can mean the difference between a golden, crunchy bite and a soggy disappointment.
But here’s the thing: Philips air fryers aren’t one-size-fits-all. Different models (like the Viva, TurboStar, or XXL) have unique heating elements, fan speeds, and basket sizes. This means the same temp on two models might yield different results. After years of testing, burning, and (occasionally) nailing it, I’ve learned that mastering your air fryer’s temperature isn’t just about following a chart—it’s about understanding how food behaves at different heat levels. Let’s dive into how you can stop guessing and start cooking with confidence.
Understanding Your Philips Air Fryer’s Temperature Range
How Philips Air Fryers Heat Up (And Why It’s Unique)
Philips air fryers use Rapid Air Technology, which combines a heating element and a high-speed fan to blast hot air around food. Think of it like a mini convection oven, but with turbocharged airflow. This means food cooks faster and more evenly than in a regular oven. But here’s the catch: temperature isn’t just a number. It’s about how the air interacts with your food’s surface, moisture, and thickness.
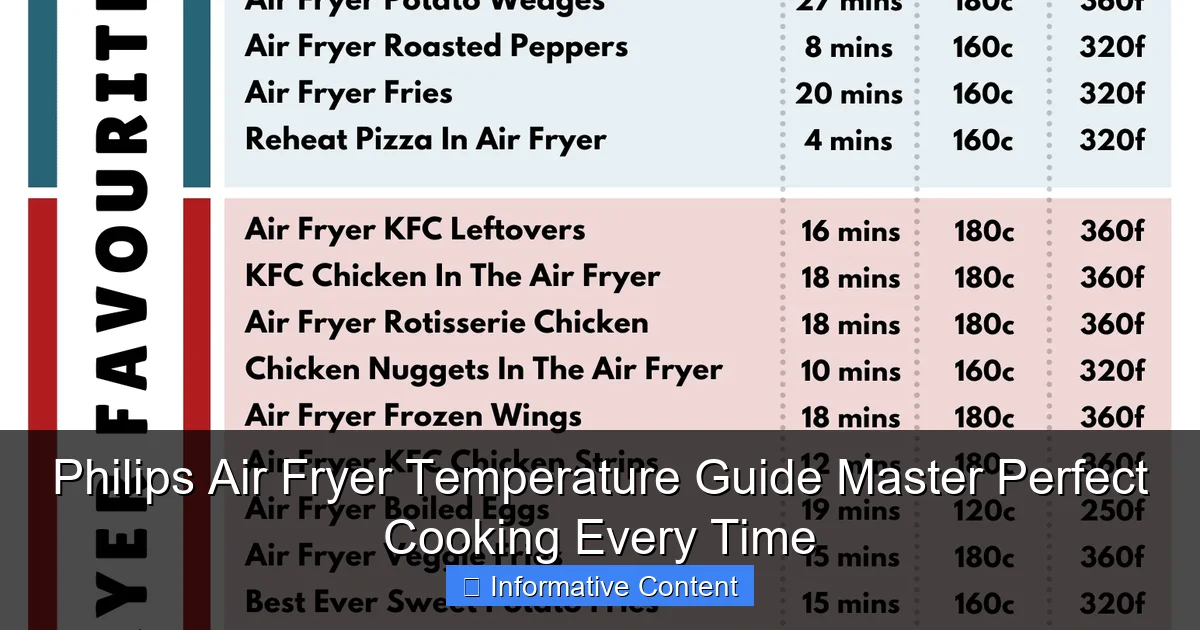
Visual guide about philips air fryer temperature guide
Image source: recipethis.com
For example, a 400°F (205°C) setting on a Philips XXL (which has a larger cooking chamber) might feel hotter than the same temp on a compact Viva model because of better air circulation. Similarly, frozen foods absorb heat differently than fresh ones. So while your air fryer’s dial might say “360°F,” the actual cooking experience depends on your model, food type, and even how you prep it.
Standard Temperature Ranges by Model
Most Philips air fryers let you set temperatures from 170°F to 400°F (75°C to 205°C), but the sweet spots vary. Here’s a quick breakdown:
- Compact models (e.g., Viva, Essential): 170°F–390°F (75°C–200°C). Ideal for small batches and delicate items.
- Mid-size (e.g., TurboStar, Premium): 170°F–400°F (75°C–205°C). Balanced for versatility.
- XXL models: 170°F–400°F (75°C–205°C) but with faster preheat and better airflow.
Pro tip: Always preheat your air fryer for 3–5 minutes at your target temperature. This ensures consistent results, especially for frozen foods or meats. (I learned this the hard way when my chicken tenders came out unevenly cooked—preheating makes all the difference!)
Temperature Settings for Popular Foods (With Real-World Examples)
Crispy Fries & Potatoes: The 360°F–380°F (180°C–190°C) Zone
Let’s talk fries. Whether you’re using frozen crinkle cuts or slicing up fresh russets, the key is moisture control. Here’s how I do it:
- Frozen fries: 380°F (190°C) for 12–15 minutes. Shake the basket halfway. Result: Crispy outside, fluffy inside.
- Fresh potato wedges: Soak in water for 30 minutes to remove starch, pat dry, toss with oil and salt. Cook at 360°F (180°C) for 18–22 minutes. Shake every 7 minutes. Pro tip: Add a splash of cornstarch to the oil for extra crunch!
Why this range? Lower temps (below 350°F) steam the potatoes; higher temps (above 400°F) burn them before the inside cooks. I once tried 400°F on fresh fries—they looked perfect but were raw in the center. Lesson learned.
Meat & Poultry: Balancing Juiciness and Crispness
Meats are tricky because you need to cook them through without drying them out. Here’s my cheat sheet:
- Chicken wings: 380°F (190°C) for 20–25 minutes. Flip halfway. For extra crispiness, pat wings dry before cooking and spray with oil.
- Boneless chicken breasts: 375°F (190°C) for 18–22 minutes. Use a meat thermometer to check for 165°F (74°C) internal temp. Pro tip: Marinate in yogurt or buttermilk for juiciness!
- Steak (1-inch thick): 400°F (205°C) for 8–12 minutes (medium-rare). Rest for 5 minutes after cooking.
Warning: Don’t overcrowd the basket! Meat needs space for air to circulate. I once tried cooking six chicken thighs at once—they steamed instead of crisping. Now I cook in batches, even if it takes longer.
Vegetables & Delicate Items: The Low-and-Slow Approach
Vegetables burn easily, so lower temps are your friend:
- Broccoli: 350°F (175°C) for 8–12 minutes. Toss with oil, salt, and garlic powder. Shake halfway.
- Asparagus: 375°F (190°C) for 6–8 minutes. Trim ends and coat lightly in oil.
- Fish (e.g., salmon fillets): 360°F (180°C) for 10–14 minutes. Skin-side down first, then flip.
For leafy greens like kale, use 320°F (160°C) for 5–7 minutes to make crispy chips. And here’s a hack: Sprinkle a tiny bit of sugar on veggies like carrots—it caramelizes at 375°F and adds sweetness!
Advanced Tips for Precision Cooking
Preheating: The Secret Weapon
I used to skip preheating to save time. Big mistake. A cold air fryer forces your food to absorb heat unevenly, leading to soggy or undercooked results. Always preheat for 3–5 minutes at your target temperature. For example:
- Want crispy bacon? Preheat to 380°F (190°C) first. Cook for 8–10 minutes. The fat renders faster, and the bacon crisps without curling.
- Reheating pizza? Preheat to 350°F (175°C). Place slices in the basket (don’t stack!) and cook for 4–5 minutes. The crust stays crisp, and the cheese melts perfectly.
Exception: If you’re cooking something with a high fat content (like sausages), preheat at 350°F (175°C) to avoid smoke from dripping grease.
Layering, Shaking, and Oil: The Golden Trio
Even the best temperature won’t save you if you ignore these three rules:
- Layering: Never pile food higher than the max fill line. Air needs to flow! For fries or wings, arrange them in a single layer. If you’re cooking a large batch, do it in stages.
- Shaking: Shake or flip food every 5–7 minutes. This ensures even browning. I use silicone-tipped tongs—they won’t scratch the non-stick basket.
- Oil: Use just enough to coat food lightly. Too much oil = greasy results; too little = dry, tough bites. My go-to: a 1/2 tsp oil per cup of food. For delicate items (like fish), skip oil entirely and use the air fryer’s non-stick coating.
Bonus tip: Line the basket with parchment paper (with holes for airflow) to reduce cleanup and prevent sticking. Just don’t cover more than 70% of the basket—blocking airflow defeats the purpose!
Temperature Adjustments for Special Diets & Preferences
Low-Fat Cooking: How to Reduce Oil Without Sacrificing Flavor
Air fryers are great for low-fat diets, but you need to tweak temperatures to compensate for less oil:
- Chicken tenders: Marinate in lemon juice or vinegar, then cook at 375°F (190°C) for 12–15 minutes. The acidity keeps meat juicy, and the high heat crisps the surface.
- Sweet potato fries: Skip oil entirely. Soak in cold water, pat dry, and cook at 360°F (180°C) for 15–18 minutes. Shake often. The natural sugars caramelize, giving a sweet, crisp edge.
For vegan dishes, try spraying aquafaba (chickpea brine) on tofu or veggies before cooking at 380°F (190°C). It adds a crispy, egg-like texture without oil!
Gluten-Free & Allergy-Friendly Adjustments
Gluten-free batters (like almond flour or rice flour) burn faster than wheat-based ones. Lower the temperature by 15–20°F and add 2–3 minutes to cooking time. Example:
- Gluten-free chicken nuggets: Cook at 360°F (180°C) for 15–17 minutes instead of 380°F (190°C) for 12–14 minutes.
For nut allergies, use sunflower seed flour or coconut flour in coatings. They crisp beautifully at 350°F (175°C) but burn easily above 370°F (190°C).
Common Mistakes & How to Fix Them
Overcooking vs. Undercooking: The Temperature Trap
It’s easy to overcompensate when food isn’t cooking fast enough. But turning up the heat too high leads to burnt exteriors and raw centers. Here’s how to avoid it:
- Problem: Fries are browning too fast but still raw inside. Fix: Lower temp to 350°F (175°C) and extend time by 3–5 minutes. The lower heat penetrates deeper.
- Problem: Chicken is dry. Fix: Reduce temp by 10–15°F and check internal temp with a thermometer. For boneless breasts, 165°F (74°C) is ideal.
Always use a meat thermometer for proteins. I keep a cheap one in my kitchen drawer—it’s saved countless meals from being overcooked!
Model-Specific Quirks to Watch For
Not all Philips air fryers behave the same. For example:
- XXL models: Preheat faster and cook more evenly. You might need to reduce time by 1–2 minutes vs. smaller models.
- TurboStar models: The fan is louder but circulates air better. Great for large batches, but delicate foods (like fish) might need a lower temp (e.g., 350°F vs. 375°F).
When in doubt, start 10°F lower than the recipe suggests and adjust up if needed. Better to undercook and add time than to salvage a burnt mess.
Data Table: Quick-Reference Temperature Guide
| Food | Temp (°F) | Temp (°C) | Time (Minutes) | Notes |
|---|---|---|---|---|
| Frozen Fries | 380 | 190 | 12–15 | Shake halfway. Preheat. |
| Fresh Potato Wedges | 360 | 180 | 18–22 | Soak in water, pat dry. |
| Chicken Wings | 380 | 190 | 20–25 | Pat dry, flip halfway. |
| Salmon Fillets | 360 | 180 | 10–14 | Skin-side down first. |
| Broccoli | 350 | 175 | 8–12 | Toss with oil, shake often. |
| Bacon | 380 | 190 | 8–10 | Preheat. Lay flat. |
| Reheated Pizza | 350 | 175 | 4–5 | Single layer, no stacking. |
Final Thoughts: Your Path to Air Fryer Mastery
When I think back to my first air fryer disaster—burnt fries and a kitchen full of smoke—I realize how much trial, error, and a little patience taught me. The Philips air fryer temperature guide isn’t just about numbers; it’s about learning how your machine interacts with food. Every model, every batch, and every craving is a chance to refine your technique.
Start by mastering the basics: preheat, shake, and don’t overcrowd. Use the temperature ranges in this guide as a foundation, but don’t be afraid to tweak them. If your chicken breasts are drying out, lower the temp. If your veggies aren’t crisping, give them a few more minutes. And always keep a meat thermometer handy—it’s the ultimate tool for avoiding guesswork.
Remember, even the best air fryer can’t fix a rushed prep. Take the time to pat food dry, season properly, and let the machine do its magic. Before you know it, you’ll be the friend who brings perfectly crispy wings to the party or turns a weeknight dinner into a gourmet experience—all with less oil, less mess, and more flavor. Happy air frying!
Frequently Asked Questions
What is the ideal temperature range for cooking in a Philips air fryer?
The ideal temperature range for most Philips air fryers is between 175°F and 400°F (80°C to 200°C). This range allows for versatile cooking, from gentle reheating to crispy frying, depending on your recipe.
How do I use the Philips air fryer temperature guide for frozen foods?
For frozen foods, preheat your Philips air fryer to 360°F (180°C) and adjust based on package instructions. Refer to the Philips air fryer temperature guide for recommended time and temperature combinations to avoid overcooking or uneven results.
Can I cook multiple dishes at once with different temperature settings?
While the Philips air fryer doesn’t support multiple temperature zones, you can cook similar items together by setting a middle-ground temperature. For best results, cook dishes with similar temperature needs in batches to ensure even cooking.
What’s the best temperature for crispy fries in a Philips air fryer?
For crispy fries, set your Philips air fryer to 380°F (190°C) and cook for 15-20 minutes, shaking halfway. The Philips air fryer temperature guide suggests this setting for golden, crunchy results without excess oil.
How do I adjust cooking time and temperature for different Philips air fryer models?
While temperatures are generally consistent across models, check your user manual for specifics. Larger models may require slight time adjustments, but the core temperature guidelines remain similar for all Philips air fryers.
Is it safe to use parchment paper or foil at high temperatures in a Philips air fryer?
Yes, parchment paper or foil is safe up to 400°F (200°C) in Philips air fryers. Ensure they’re weighted down with food to prevent them from touching the heating element, especially at high temperatures.