
Featured image for gowise air fryer user guide
Image source: airfrying.net
Master your GoWise Air Fryer with essential tips and tricks from this comprehensive user guide, designed to help you achieve crispy, delicious meals every time. From preheating secrets to optimal basket spacing, learn how to maximize flavor, reduce cooking time, and avoid common mistakes for foolproof results. Whether you’re a beginner or a seasoned user, these expert-backed techniques ensure perfect air-fried dishes with ease.
Key Takeaways
- Preheat for crispiness: Always preheat your GoWise air fryer for optimal texture and even cooking.
- Shake the basket: Shake food halfway through cooking to ensure uniform browning and crispiness.
- Use minimal oil: A light spray or brush of oil enhances crispness without excess fat.
- Layer food properly: Avoid overcrowding to let hot air circulate and cook evenly.
- Clean after each use: Wipe down the basket and tray immediately for easy maintenance.
- Experiment with temps: Adjust cooking times and temps for perfect results with every recipe.
📑 Table of Contents
- Why the GoWise Air Fryer is a Game-Changer in the Kitchen
- Getting Started: Your GoWise Air Fryer Setup & First Steps
- Mastering Cooking Techniques for Perfect Results
- Top Recipes to Try (and How to Adapt Them)
- Cleaning and Maintenance: Keep Your Air Fryer in Top Shape
- Common Mistakes and How to Avoid Them
- Comparing GoWise Models: Which One Fits Your Needs?
- Final Thoughts: Your GoWise Air Fryer Journey Starts Now
Why the GoWise Air Fryer is a Game-Changer in the Kitchen
Let me take you back to the first time I used my GoWise air fryer. I was skeptical—how could a machine that looks like a futuristic toaster oven cook fries, chicken wings, and even desserts with little to no oil? But after one batch of crispy, golden sweet potato fries, I was hooked. The GoWise air fryer has become a staple in my kitchen, not just because it makes healthier meals possible, but because it’s fast, consistent, and surprisingly versatile.
Whether you’re a busy parent, a college student, or someone trying to eat better without sacrificing flavor, the GoWise air fryer is designed to simplify your cooking routine. It uses rapid air circulation technology to cook food evenly, giving you that crispy texture without the guilt. But like any kitchen tool, it has a learning curve. That’s why I’ve put together this GoWise air fryer user guide—to help you unlock its full potential, avoid common mistakes, and create meals that taste like they came from a restaurant kitchen (without the wait or the price tag).
Getting Started: Your GoWise Air Fryer Setup & First Steps
Unboxing and Initial Setup
When you first unbox your GoWise air fryer, you’ll find the main unit, a removable basket, a crisper plate (sometimes called a tray), and a quick-start guide. Before using it, wash the basket and crisper plate with warm, soapy water. This removes any manufacturing residue and ensures your food doesn’t have an odd taste during the first use.
Visual guide about gowise air fryer user guide
Image source: airfrying.net
Place your air fryer on a flat, heat-resistant surface—away from walls and cabinets. It needs at least 5 inches of clearance on all sides for proper airflow. Plug it in, and you’re ready to go. Pro tip: Don’t preheat the basket. The GoWise air fryer heats up quickly, and preheating an empty basket can damage the non-stick coating over time.
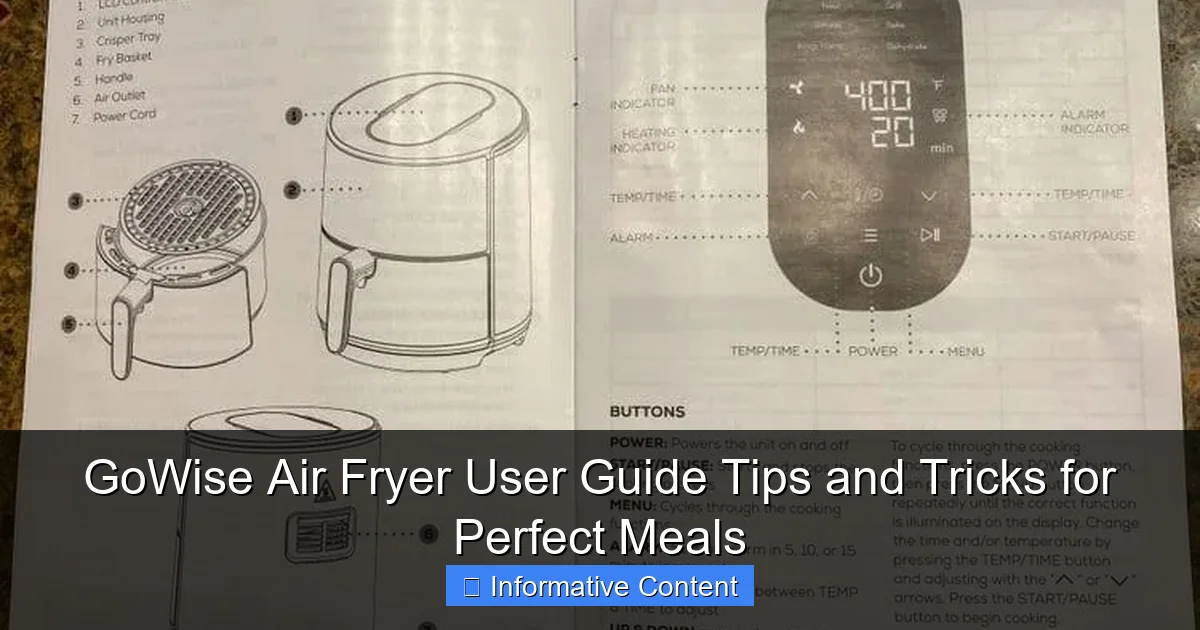
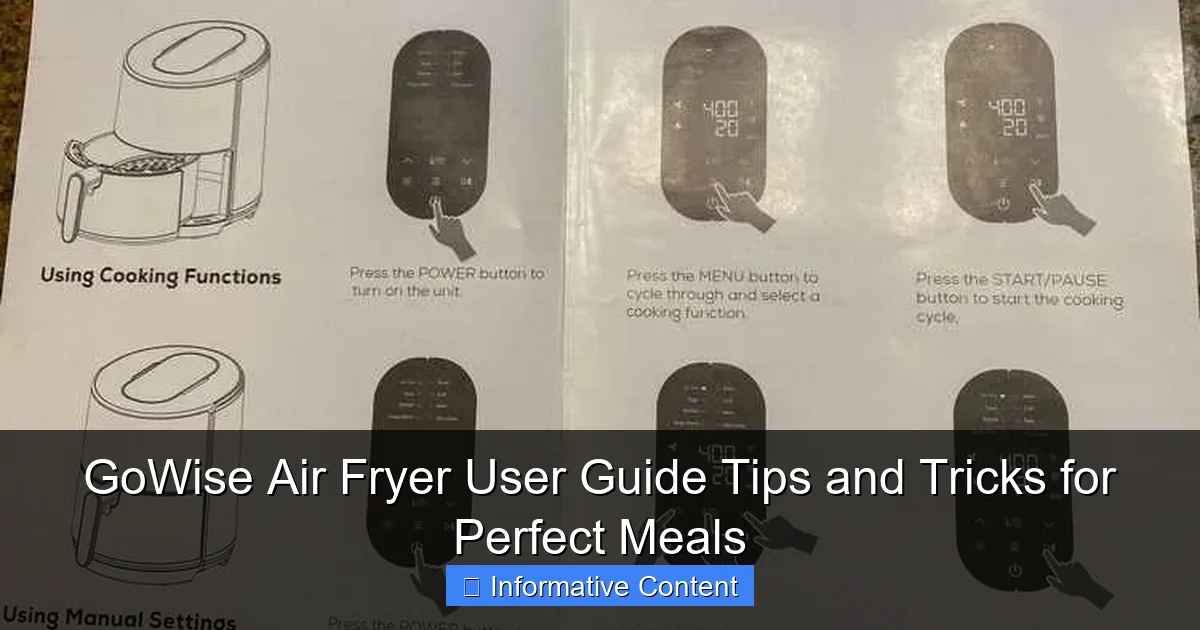
Understanding the Control Panel
Most GoWise models come with digital touchscreens, while older versions have dials. Here’s a quick rundown of what you’ll see:
- Power Button: Turns the unit on/off.
- Time and Temperature Controls: Adjust cooking time (usually up to 60 minutes) and temperature (180°F–400°F).
- Preset Buttons: Common presets include “Fries,” “Chicken,” “Fish,” “Steak,” “Shrimp,” and “Bake.” These are great for beginners but feel free to customize once you’re comfortable.
- Timer and Temperature Display: Shows remaining time and current temperature.
Example: Want to cook frozen chicken nuggets? Use the “Chicken” preset (380°F, 12 minutes), but check halfway through and shake the basket for even browning.
First-Time Use: A Simple Test Run
Before cooking your favorite recipe, do a “dry run” with a few slices of bread or a small batch of frozen fries. This helps you get familiar with the sound (it’s not loud, but it’s not silent) and how the basket slides in and out. It also lets you see how quickly the air fryer heats up. I once forgot to set the timer and left it running—luckily, the automatic shut-off saved my kitchen from disaster!
Mastering Cooking Techniques for Perfect Results
Temperature and Timing: The Golden Rules
Air frying isn’t just about tossing food in and pressing “start.” Timing and temperature matter. Here’s a cheat sheet:
- Frozen foods: Start at 380°F–400°F for crispiness. Shake halfway through.
- Fresh meats (chicken, pork): 375°F for 15–20 minutes, depending on thickness. Use a meat thermometer to ensure doneness (165°F for chicken).
- Vegetables: 360°F for 8–12 minutes. Toss with a light oil spray or a tablespoon of olive oil for better browning.
- Baking (cakes, brownies): 320°F–350°F for 15–25 minutes. Check with a toothpick.
Remember: Smaller pieces cook faster. Chop potatoes into even cubes, not wedges, for consistent results. And don’t overcrowd the basket—air needs space to circulate!
Shaking, Tossing, and Pausing: The Secret to Even Cooking
The GoWise air fryer’s basket design lets you pause cooking to shake or flip food. This is crucial for even browning. For example, when cooking french fries:
- Set to 380°F for 12 minutes.
- After 6 minutes, pull out the basket, give it a gentle shake, and slide it back in.
- Result: Crispy, golden fries without burnt edges.
Same rule applies to chicken wings, shrimp, or even roasted nuts. No shaking? You’ll end up with one side burnt and the other soggy.
Oil, Spray, or None? Navigating Fat Content
One of the biggest benefits of the GoWise air fryer is reducing oil. But a little oil goes a long way:
- No oil: Works for frozen foods (they have oil already) or naturally fatty meats (like bacon).
- Light spray: Use a spray bottle with olive oil for fresh veggies or lean meats. Just 1–2 seconds of spray is enough.
- Marinades: Toss chicken or tofu in a flavorful marinade (soy sauce, garlic, honey) before air frying. The marinade reduces oil need and adds taste.
Caution: Avoid aerosol cooking sprays—they can damage the non-stick coating over time. Use a refillable spray bottle instead.
Top Recipes to Try (and How to Adapt Them)
Breakfast: Air-Fried Eggs, Toast, and Hash Browns
Yes, you can cook eggs in a GoWise air fryer! Here’s how:
- Soft-boiled eggs: Place eggs in the basket, 300°F for 12 minutes. Cool in ice water to stop cooking.
- Hash browns: Use frozen or shred potatoes, toss with oil, and air fry at 380°F for 10–12 minutes. Shake once.
- Toast: Place bread in the basket, 350°F for 3–4 minutes. Perfect for quick breakfasts.
Tip: Use a silicone egg cup for scrambled eggs or mini frittatas. The air fryer cooks them evenly in 8–10 minutes.
Lunch/Dinner: Crispy Chicken, Salmon, and Veggies
Let’s tackle a weeknight favorite: balsamic-glazed salmon.
- Pat salmon dry, season with salt, pepper, and a drizzle of balsamic vinegar.
- Air fry at 375°F for 10–12 minutes (depending on thickness).
- Serve with roasted asparagus (tossed in olive oil, 360°F for 8 minutes).
For chicken, try honey-garlic chicken thighs:
- Marinate thighs in honey, soy sauce, garlic, and ginger for 30 minutes.
- Air fry at 380°F for 18–20 minutes. Flip halfway.
- Garnish with green onions and sesame seeds.
Pro tip: Use parchment liners for sticky marinades to prevent mess and make cleanup easier.
Snacks and Sides: Fries, Wings, and Even Desserts
Air-fried snacks are where the GoWise air fryer shines:
- Sweet potato fries: Cut into 1/4-inch sticks, toss with oil, 380°F for 12–14 minutes. Shake twice.
- Buffalo wings: Cook wings at 400°F for 20 minutes, flip at 10 minutes. Toss in sauce after cooking.
- Churros: Pipe dough into the basket, spray lightly with oil, 375°F for 8 minutes. Roll in cinnamon sugar.
Bonus: Try air-fried bananas with a sprinkle of cinnamon—ready in 6 minutes!
Cleaning and Maintenance: Keep Your Air Fryer in Top Shape
Daily Cleaning Routine
After each use, clean the basket and crisper plate. Here’s how:
- Let the unit cool for 10–15 minutes.
- Wash the basket and plate with warm, soapy water. Use a soft sponge—no steel wool!
- Wipe the interior and exterior with a damp cloth. For stubborn grease, use a baking soda paste.
- Dry thoroughly before storing.
Never submerge the main unit in water. The heating element is inside, and water damage is irreversible.
Deep Cleaning for Stubborn Stains
If you notice a burnt smell or sticky residue:
- Soak the basket in hot, soapy water for 30 minutes.
- For tough stains, mix 1 tbsp baking soda with water, scrub gently, then rinse.
- Use a cotton swab to clean around the heating element (unplugged!).
Tip: Line the basket with parchment paper or a silicone mat to reduce scrubbing. Just don’t block the air vents!
Longevity Tips: Protect the Non-Stick Coating
The non-stick coating is great, but it’s fragile. To extend its life:
- Never use metal utensils inside the basket.
- Avoid abrasive cleaners or scouring pads.
- Store the basket with a paper towel between it and the crisper plate to prevent scratches.
If the coating starts to chip, contact GoWise customer service. Most models have a 1-year warranty.
Common Mistakes and How to Avoid Them
Overcrowding the Basket
This is the #1 mistake. Overcrowding blocks airflow, leading to soggy food. As a rule of thumb, fill the basket no more than halfway. For fries, that’s about 1–2 cups. Need to cook more? Do it in batches.
Example: I once tried to cook 3 lbs of chicken wings in one go. Result? Some were burnt, others undercooked. Now I cook 1 lb at a time—perfect every time.
Ignoring the Shake/Pause Step
Skipping the shake means uneven cooking. Set a timer for halfway through your cook time and pull the basket out. Even a quick shake makes a huge difference in texture.
Using the Wrong Temperature
High heat isn’t always better. Delicate foods like fish or veggies burn easily. Start with the lower end of the recommended range and adjust. For example, broccoli at 400°F turns to charcoal—stick to 360°F.
Not Preheating (or Preheating Too Much)
Most GoWise models don’t require preheating, but some recipes benefit from it. For crispy results, run the air fryer empty for 2–3 minutes at 380°F before adding food. But never preheat for more than 5 minutes—it stresses the heating element.
Neglecting the Drip Tray
The drip tray (under the basket) catches grease and crumbs. Empty it after every use. If you skip this, smoke and odors build up. I learned this the hard way when my kitchen smelled like burnt bacon for days!
Comparing GoWise Models: Which One Fits Your Needs?
GoWise offers several air fryer models, each with unique features. Here’s a quick comparison to help you choose:
| Model | Capacity (Quarts) | Control Type | Key Features | Best For |
|---|---|---|---|---|
| GoWise GW22638 | 3.7 | Digital Touchscreen | 8 presets, 1700W, dishwasher-safe basket | Small households, beginners |
| GoWise GW22640 | 5.8 | Digital Touchscreen | 10 presets, dehydrator function, 1700W | Families, meal prep, snacks |
| GoWise GW22731 | 8.0 | Digital Touchscreen + Rotary Dial | Dual baskets, 1800W, 12 presets | Large families, cooking multiple items |
| GoWise GW22956 | 3.7 | Rotary Dial | Compact, 1500W, budget-friendly | Small kitchens, college students |
Capacity Tip: A 3.7-quart model fits 2–3 servings. For a family of 4, go for 5.8 quarts or higher. The dual-basket GW22731 is a game-changer—you can cook chicken and veggies at the same time!
Final Thoughts: Your GoWise Air Fryer Journey Starts Now
The GoWise air fryer user guide isn’t just about pressing buttons—it’s about building confidence in your cooking. From crispy fries to juicy chicken, this little machine delivers big results. But like any tool, it thrives when you understand its quirks. Remember: shake the basket, don’t overcrowd, and clean it regularly. And when in doubt, start with the presets, then tweak as you go.
I’ll never forget the first time my kids asked for “air-fried chicken” instead of fried. That’s when I knew this appliance was more than a gadget—it’s a way to make healthy eating easy, fun, and delicious. So grab your GoWise air fryer, try a recipe, and don’t be afraid to experiment. The perfect meal is just a basket away.
Frequently Asked Questions
How do I use the GoWise Air Fryer for the first time?
Before first use, wash the basket and pan with warm, soapy water and dry thoroughly. Run the air fryer empty at 400°F for 10 minutes to burn off any manufacturing residue, as outlined in the GoWise Air Fryer user guide.
What are the best cooking times for frozen foods in a GoWise Air Fryer?
Frozen foods like fries, nuggets, or mozzarella sticks typically cook at 360–400°F for 10–15 minutes. Always shake the basket halfway through for even crispiness—check your model’s GoWise Air Fryer user guide for specific presets.
Can I cook multiple foods at once in my GoWise Air Fryer?
Yes, but avoid overcrowding the basket to ensure even airflow and crisp results. Layer foods like chicken wings and veggies, or use skewers to separate items. Adjust cooking time if needed.
How do I clean my GoWise Air Fryer after use?
Unplug the unit and let it cool. The non-stick basket and pan are dishwasher-safe, or hand-wash with a soft sponge. Wipe the exterior with a damp cloth—never submerge the main unit.
Why is my food not crispy when using the GoWise Air Fryer?
Overcrowding, excess moisture, or insufficient oil can reduce crispiness. Pat food dry, lightly coat with oil, and shake the basket mid-cook. Refer to the GoWise Air Fryer user guide for recommended oil amounts.
Does the GoWise Air Fryer have a preheat function?
Most GoWise models don’t auto-preheat, but you can manually run it at your target temperature for 3–5 minutes before adding food. This ensures optimal cooking from the first bite.