
Featured image for philips air fryer cooking guide
Image source: i.pinimg.com
Master the Philips Air Fryer with this essential cooking guide that unlocks crispy, delicious meals in minutes—without the guilt of deep frying. From golden fries to juicy meats, learn expert tips, optimal settings, and foolproof recipes to maximize flavor and efficiency every time.
Key Takeaways
- Master preheating: Always preheat for crispier, evenly cooked meals in less time.
- Use minimal oil: Achieve fried textures with 1-2 tsp oil, not cups.
- Batch smartly: Avoid overcrowding—cook in batches for optimal air circulation.
- Leverage presets: Utilize built-in programs for perfect results with minimal guesswork.
- Shake halfway: Flip or shake food for uniform browning and crunch.
- Clean promptly: Remove residue immediately to maintain performance and extend lifespan.
📑 Table of Contents
- Philips Air Fryer Cooking Guide: Master Delicious Meals Fast
- How the Philips Air Fryer Works (And Why It’s Special)
- Getting Started: Your Philips Air Fryer Setup Checklist
- Mastering Cooking Techniques: Tips for Every Food Type
- Philips Air Fryer Cooking Guide: Data Table for Perfect Results
- Troubleshooting Common Air Fryer Problems
- Beyond the Basics: Creative Recipes and Hacks
- Conclusion: Your Philips Air Fryer Is a Kitchen Game-Changer
Philips Air Fryer Cooking Guide: Master Delicious Meals Fast
Remember that first time you tried an air fryer? Maybe it was a crispy chicken wing that shattered with a golden crunch, or a batch of sweet potato fries that didn’t leave your kitchen smelling like a fast-food joint. That’s the magic of a Philips air fryer—it promises the taste and texture of deep frying, without the guilt, mess, or lingering odors. As someone who’s tested air fryers for years, I can tell you the Philips models consistently stand out for their speed, reliability, and user-friendly design. But even the best appliance needs a little know-how to truly shine.
This Philips air fryer cooking guide is your friendly, no-nonsense roadmap to mastering your device. Whether you’re a first-time air fryer owner or someone who’s been using one for years but still struggles with soggy veggies or undercooked meats, this guide will help you get the most out of your machine. We’ll walk through how it works, share pro-level tips, troubleshoot common mistakes, and even include a handy data table to help you nail cooking times and temps. No hype, just real talk—because your air fryer should work for you, not the other way around.
How the Philips Air Fryer Works (And Why It’s Special)
The Science Behind the Crisp
Let’s start with the basics. Unlike traditional ovens that rely on radiant heat from heating elements, a Philips air fryer uses rapid air circulation technology (also called Rapid Air Technology in Philips branding). Think of it like a convection oven on turbo mode. A powerful fan sits above the cooking basket, forcing hot air down and around the food in a continuous loop. This creates a “whirlpool” of heat that crisps the surface of your food while cooking the inside evenly.

Visual guide about philips air fryer cooking guide
Image source: m.media-amazon.com
The result? A golden, crispy exterior with minimal oil—often just a teaspoon or two, compared to cups in deep frying. It’s not magic, but it’s close. And because the air moves so quickly, cooking times are often 20-30% faster than conventional ovens.
Why Philips Stands Out
Not all air fryers are created equal. Philips was one of the first to patent this rapid air concept, and their models have evolved to include thoughtful features that set them apart:
- Consistent airflow: The basket design ensures hot air reaches every nook, reducing the need to shake or flip food.
- Pre-set programs: Many models (like the HD9650 or Viva Collection) come with 7-8 presets (fries, chicken, fish, etc.) that take the guesswork out of cooking.
- Digital controls: Easy-to-read displays and precise temperature settings (in 5°F or 1°C increments) let you fine-tune recipes.
- Large capacity options: Ranging from 2.75 to 6.2 quarts, there’s a size for solo diners or families of four.
That said, Philips air fryers aren’t perfect. They can be pricier than budget models, and the non-stick coating on the basket may wear over time (more on that later). But for reliability and performance, they’re a solid investment.
Getting Started: Your Philips Air Fryer Setup Checklist
Unboxing and First-Time Use
When you first unbox your Philips air fryer, take a moment to appreciate its sleek design. But don’t rush to plug it in just yet. Here’s what to do:
- Wash the basket and tray: Use warm, soapy water. Avoid steel wool—it’ll scratch the non-stick coating.
- Season the basket (optional): Lightly coat the basket with oil and run it at 390°F (200°C) for 5 minutes. This helps prevent food from sticking during the first few uses.
- Place on a heat-resistant surface: Keep it at least 5 inches from walls and cabinets. The back vents get hot!
- Preheat (if your model has this feature): Some Philips models let you preheat to 350°F (175°C) for 3 minutes before adding food. This ensures even cooking from the start.
Pro tip: If your air fryer has a “shake reminder,” use it! It’s easy to forget, but shaking halfway through ensures even browning.
Understanding Your Control Panel
Philips air fryers vary by model, but most share similar controls:
- Temperature dial/slider: Ranges from 170°F (75°C) for delicate foods to 400°F (205°C) for maximum crisp.
- Timer: Up to 60 minutes. Some models auto-pause when you pull the basket out.
- Pre-set programs: Look for icons like “fries,” “chicken,” or “veggies.” These are great for beginners.
- Keep warm function: Keeps food at 140°F (60°C) after cooking—ideal for family-style meals.
For example, on the Philips Viva TurboStar, the digital display shows both time and temp, with a handy “shake” icon that flashes halfway through cooking. No more guessing when to flip your chicken!
Mastering Cooking Techniques: Tips for Every Food Type
Frying Favorites: Fries, Wings, and Beyond
Let’s be real: air fryers are famous for fries and wings. But there’s a right and wrong way to do it.
- Frozen fries: No thawing needed! Spread them in a single layer. Use 375°F (190°C) for 12-15 minutes. Shake halfway. Pro tip: Sprinkle with a pinch of cornstarch (½ tsp per cup) for extra crispiness.
- Chicken wings: Toss with 1 tsp oil, salt, and spices. Cook at 400°F (205°C) for 25-30 minutes. Flip halfway. For saucy wings, add sauce in the last 5 minutes to avoid burning.
- Fish sticks/fish fillets: Use 390°F (200°C) for 10-12 minutes. No oil needed! The breading gets crispy naturally.
Common mistake: Overcrowding. Your air fryer isn’t a deep fryer—air needs to circulate. If you see steam, you’ve added too much food.
Roasting and Baking: Veggies, Meats, and Baked Goods
Your Philips air fryer is a multi-tasker. Try these:
- Vegetables: Cut into uniform pieces (e.g., 1-inch broccoli florets). Toss with 1 tsp oil and salt. Roast at 375°F (190°C) for 8-12 minutes. Try Brussels sprouts, asparagus, or zucchini.
- Meats:
- Chicken breasts: 360°F (180°C) for 18-22 minutes (flip halfway). Use a meat thermometer—165°F (74°C) is safe.
- Steaks: 400°F (205°C) for 8-10 minutes (medium-rare). Let rest 5 minutes before slicing.
- Baked goods: Yes, you can bake! Use a small oven-safe dish (e.g., ramekin or cake pan). For brownies, use 320°F (160°C) for 15-18 minutes. Check with a toothpick.
Pro tip: For meats, pat them dry first. Moisture = steam = soggy results.
Reheating Leftovers: Crisp, Not Soggy
Reheat pizza, fried chicken, or even lasagna without drying it out:
- Pizza: 325°F (160°C) for 4-5 minutes. The crust stays crispy, and the cheese melts perfectly.
- Fried chicken: 350°F (175°C) for 5-7 minutes. No more rubbery texture!
- Pasta dishes: Add a splash of water to the basket. 300°F (150°C) for 5-8 minutes.
Avoid reheating soups or stews—they’ll splatter. Use the stovetop instead.
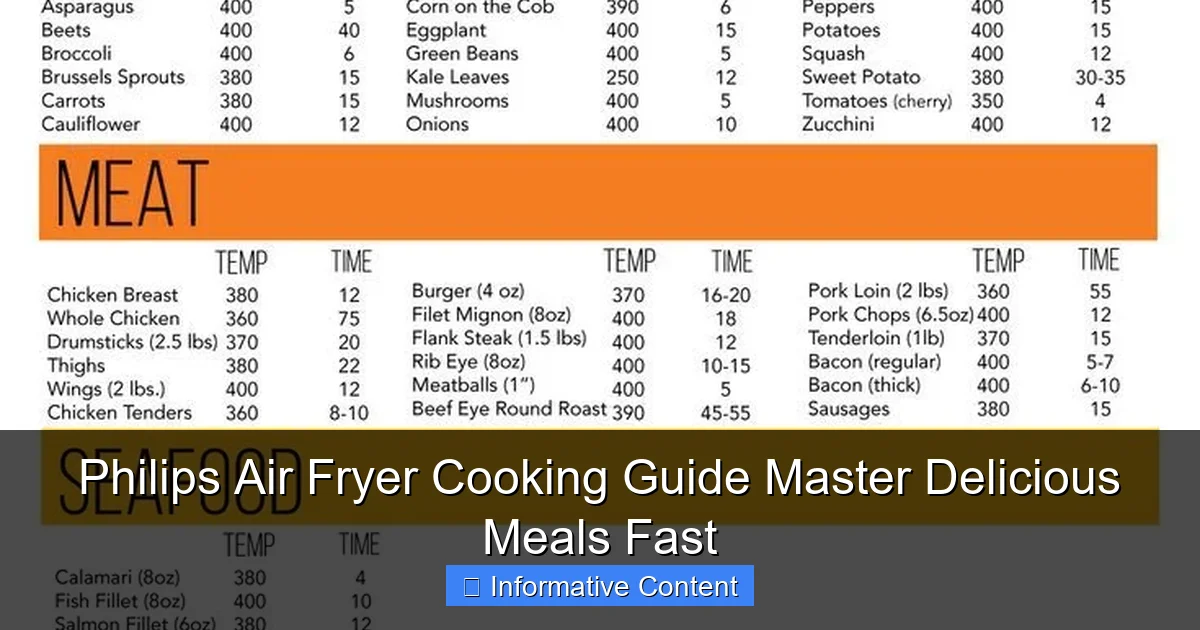
Philips Air Fryer Cooking Guide: Data Table for Perfect Results
Here’s a quick-reference table for common foods. Note: Times and temps are for a Philips Viva TurboStar (4.1 qt). Adjust slightly for other models.
| Food | Amount | Temp (°F/°C) | Time (min) | Tips |
|---|---|---|---|---|
| Frozen fries | 2 cups | 375°F (190°C) | 12-15 | Shake halfway; add cornstarch for crispiness |
| Chicken wings | 1 lb | 400°F (205°C) | 25-30 | Flip halfway; add sauce in last 5 min |
| Salmon fillet | 6 oz | 380°F (193°C) | 10-12 | Pat dry; check for 145°F (63°C) internal temp |
| Brussels sprouts | 2 cups | 375°F (190°C) | 10-12 | Toss with oil, salt, and pepper |
| Chicken breast | 8 oz | 360°F (180°C) | 18-22 | Flip halfway; rest 5 min before slicing |
| Brownies (baked) | 1 small batch | 320°F (160°C) | 15-18 | Use oven-safe dish; check with toothpick |
| Pizza (reheat) | 2 slices | 325°F (160°C) | 4-5 | Place directly on basket |
| Hard-boiled eggs | 4 eggs | 275°F (135°C) | 15 | Cool in ice water for easy peeling |
Important: These are guidelines. Always check food for doneness. Thicker cuts may need 2-3 extra minutes.
Troubleshooting Common Air Fryer Problems
Why Is My Food Soggy?
The #1 complaint. Here’s why it happens—and how to fix it:
- Overcrowding: Air can’t circulate. Cook in batches.
- Too much oil: A light spray is enough. Excess oil pools and steams food.
- High-moisture foods: Veggies like zucchini release water. Pat them dry first or cook at a higher temp (390°F/200°C).
- Not preheating: Start with a hot basket. If your model lacks a preheat setting, run it empty for 3 minutes at 350°F (175°C).
Real talk: Some foods (like mushrooms) will never get crispy. They’re better roasted in a conventional oven.
Food Is Sticking to the Basket
Frustrating, right? Try these fixes:
- Use parchment liners: Cut to fit the basket. They’re reusable and non-stick.
- Spray with oil: Use an oil mister or brush. Avoid cooking spray—it can damage the non-stick coating over time.
- Don’t move food too soon: Let it cook 3-4 minutes before flipping. The crust needs time to form.
If the coating is peeling, contact Philips. Most models have a 2-year warranty.
Uneven Cooking
If one side is burnt and the other raw:
- Shake or flip halfway: Even with Rapid Air Tech, some foods need it.
- Rotate the basket: Pull it out halfway and give it a 180° turn.
- Cut food evenly: 1-inch pieces cook more uniformly than mixed sizes.
Bonus tip: For meats, let them sit at room temperature for 10-15 minutes before cooking. Cold meat cooks unevenly.
Beyond the Basics: Creative Recipes and Hacks
Breakfast in the Air Fryer
Yes, you can make breakfast! Try:
- Hard-boiled eggs: 275°F (135°C) for 15 minutes. Cool in ice water for easy peeling.
- Hash browns: Shredded potatoes, 1 tsp oil, salt. 375°F (190°C) for 12-15 minutes. Shake halfway.
- Breakfast sandwiches: Assemble an English muffin with egg, cheese, and bacon. 350°F (175°C) for 5-7 minutes.
Pro hack: Use a muffin tin to make individual frittatas. 320°F (160°C) for 12-14 minutes.
Healthy Swaps and Diet-Friendly Meals
Your Philips air fryer is a healthy eating ally:
- Keto: Chicken skin, pork rinds, or zucchini fries. No breading needed!
- Vegetarian: Crispy tofu (press first to remove water) or portobello “steaks.”
- Gluten-free: Use almond flour for breading. Try GF chicken tenders at 390°F (200°C) for 10-12 minutes.
Example: Air-fried cauliflower “wings” tossed in buffalo sauce. Only 1 tsp oil, 100 calories per serving!
Party Foods and Entertaining
Impress guests with minimal effort:
- Jalapeño poppers: 375°F (190°C) for 8-10 minutes.
- Spring rolls: 390°F (200°C) for 6-8 minutes.
- Stuffed mushrooms: 350°F (175°C) for 12-14 minutes.
Bonus: Use the “keep warm” function to hold food at the perfect temp for serving.
Conclusion: Your Philips Air Fryer Is a Kitchen Game-Changer
Let’s wrap this up. Your Philips air fryer isn’t just a gadget—it’s a tool for healthier, faster, and more delicious meals. From crispy fries to juicy chicken and even baked treats, it handles it all with minimal oil and cleanup. But like any tool, it works best when you know how to use it.
Remember the key takeaways:
- Preheat when possible—it makes a huge difference.
- Don’t overcrowd—air circulation is everything.
- Shake or flip halfway—even the best tech needs a little help.
- Use the right oil—a light spray or brush is enough.
- Experiment—your air fryer can do way more than frozen foods.
And hey, if something doesn’t work? Don’t sweat it. I’ve had my share of burnt wings and soggy veggies. But every mistake taught me something. Now, my air fryer is one of my most-used appliances—and I hope yours will be too.
So go ahead: try that recipe, tweak the time, and make it your own. With this Philips air fryer cooking guide, you’re not just following instructions—you’re building skills. And that’s what great cooking is all about. Happy frying! 🍟
Frequently Asked Questions
What is the Philips Air Fryer Cooking Guide and how can it help me?
The Philips Air Fryer Cooking Guide is your go-to resource for mastering quick, healthy, and delicious meals using your air fryer. It offers step-by-step instructions, cooking times, and tips tailored to Philips models to ensure perfect results every time.
Can I cook frozen foods in my Philips air fryer?
Absolutely! The Philips Air Fryer Cooking Guide includes detailed instructions for cooking frozen foods like fries, chicken nuggets, and fish sticks without thawing. Simply adjust cooking times by 2-5 minutes for optimal crispiness and flavor.
What are the best oils to use with a Philips air fryer?
Light oils with high smoke points, like avocado, canola, or grapeseed oil, work best in your Philips air fryer. Avoid heavy or flavored oils, as they can leave residue and affect cooking performance.
How do I clean my Philips air fryer after cooking?
Remove the basket and tray, then wash them with warm, soapy water or place them in the dishwasher. Wipe the exterior with a damp cloth—avoid submerging the main unit to protect the heating elements.
What are the most common mistakes when using a Philips air fryer?
Overcrowding the basket and skipping preheating are frequent errors that lead to uneven cooking. Always follow the Philips Air Fryer Cooking Guide recommendations for spacing and preheat for 3-5 minutes when needed.
Can I bake or roast in my Philips air fryer?
Yes! Your Philips air fryer doubles as a mini oven for baking cakes, roasting veggies, or even cooking a small chicken. Use oven-safe dishes and adjust temperatures slightly lower than traditional oven settings for best results.